12/02/2015

Garnier Skin Naturals BB Cream - Miracle Skin Perfector - Review


.
Hello everyone,

Due to some hectic routine, I was not able to continue sharing my experiences and thoughts with all of you. But now I am back and hope to share new reviews and other posts regularly.

I have bought Garnier Skin Naturals BB Cream- Miracle Skin Perfector and would like to share my views and experience of this BB cream.

Photo: Oh Lady Mania

The Brand Claim:

Miracle Skin Perfector is a new generation of skin care. This BB cream uses an all-in-one technology. It combines all beauty routine steps in one single gesture with a long term care plus a light touch of make-up for am immediate "Baby Skin Effect".

Thanks to Vitamin C derivatives, known to have anti-oxidant properties, it boosts skin glow and luminosity. Its mineral pigments, naturally unify your skin. Its SPF15 filter helps protect the skin from UV.

Spread the BB cream Miracle Skin Perfector like your regular moisturizer on a clean skin.

To increase coverage, do not hesitate to apply one more coat.

Product Claims:

Miracle Skin Perfector daily moisturizer 5-in-1

Classic - Light

1, Even tones
2, Blurs Lines & Imperfections
3, Boosts Healthy glow
4, 24H Moisture
5, Protection UVA/UVB-SPF-15

My Verdict  

I found Garnier Skin Naturals BB Cream amazingly perfect for my combination skin. During application, it blends very easily even with finger tips and gives good coverage. It gives even look by giving a nice glow and at the same time moisturizes the skin for more than six hours. During day time BB cream protects skin against scorching sun because of UVA/UVB-SPF-15 protection properties.

Availability

Garnier Skin Naturals BB Cream is easily available in market. I bought it from a shopping mall in Clifton.

Rating

I would rate it 4 stars out of 5.


.


10/06/2015

Aromatic Daal Makhani


.
Daal Makhani with Boiled Rice

Daal Makhani is very much different from the routine daal (lentil) recipes that we usually make at homes. It has very strong aroma and smooth creamy texture that will allure your family.

It is quick to cook as there is no need to go to market to buy extra ordinary ingredients.  All the basic ingredients required to make this special daal can be found in your kitchen cabinets and in your fridge.

Let's start our Aromatic Makhani Daal recipe:

Ingredients:

Moong daal 1 Cup
Masoor daal 1 Cup
Red chili powder 1/2 tsp
Turmeric powder 1/2 tsp
Cumin whole 1/4 tsp
Curry leaves 7_8
Mustard seeds 1/2 tsp
Red pepper whole 5
Ginger paste 1/2 tsp
garlic paste 1/2 tsp
Tomatoes 1 medium  chopped
Onion 2 t chopped
Green chilies 3 chopped
Fresh Cream 3 tbsp
Green coriander 2 tbsp chopped
Salt to taste
Oil 3 tbsp
Butter 1 tbsp

Method:

Wash and Soak both lentils for 30 minutes.
In a pot add your soaked lentils along with water. Water level should be above the lentils.
Add red chili powder, turmeric powder, cumin whole in lentils. Mix well.
Cook till lentils become tender and water evaporates.
To adjust desired consistency add water and bring it to boil.
Add salt as per taste. Mix well

For Tempering:

Heat Pan .
Add Oil. Add butter.
Add curry leaves and mustard seeds. Saute
Add ginger paste and garlic paste. Saute till light golden.
Add chopped onion. Saute till light golden.
Add dried red chilies broken in pieces. Saute
Add chopped tomatoes.Saute.
Add finely chopped green chilies.

Now pour this tempering in your pre-boiled daal. Mix it well.
Add cream and mix it well so that Daal becomes thick in texture.
Dish out in a bowl and garnish with coriander leaves and cream.
Serve it with boiled rice or naan.


.


9/11/2015

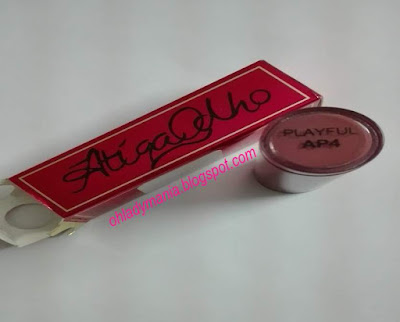
Review: Odho Cosmetics Lipstick


.
Photo: Oh Lady Mania
Hello everyone,

Today I am going to post a review of a lipstick from the Odho Cosmetics. I bought it from Scentsation, Dolmen Mall Clifton. I have been using this for the past fifteen days and I am going to tell you about its results.

So, let’s see what I have gathered about this lipstick from my experience:

The Brand Claims:

Atiqa Odho cosmetics have maintained their quality since day one. It is an ISO certified brand of Pakistan. Keeping in mind the Pakistan’s women skin tones, the Odho cosmetics have been created with good quality products at affordable prices.

Photo: Oh Lady Mania
My Verdict:

Odho’s lipsticks have been endorsed as halal products because no lead or animal fat has been used in their formula.

As far as the packaging is concerned, the lipsticks come in a red and golden color combination bullet with a knob style cover. It looks pretty attractive due to vibrant colour covering.

I have found my lipstick a little bit creamy with hydrating texture. With its moisturizing quality, it slides smoothly on lips without highlighting the fine lines. My Odho lipstick lasts up to five to six hours with an amazing comfortable feel. Surprisingly, it doesn’t bleed like some other lipsticks. The colour is as per my choice so I selected it within few minutes. 

Photo: Oh Lady Mania

All things considered, I liked my Odho lipsticks for its moisturizing coverage that lasted for good five hours. I always like to have light colours and I found this shade as a good collection in my cosmetics.

I have not tried the matte lipsticks of Odho cosmetics so I can’t say what they would be in texture and pigment. However, I can say that my selected lipstick was a nice decision as it is up to the scale of international brands.

My Rating:

I would rate it 4/5

Availability:

Odho cosmetics are available at all leading stores in all big cities. These can be purchased online as well.


.


9/01/2015

Spicy Chicken Makhani


.
Photo: Oh Lady Mania

Are you getting bored of eating Chicken Qorma, Chicken Karahi and other regular Chicken gravies, if yes, than go for something unique in taste.

Chicken Makhani can be a fun to cook and it will rejuvenate your taste buds by giving a blend of spices and flavour of butter and cream.

Lets start cooking Spicy Chicken Makhani

Ingredients:

500 gms Chicken boneless
1/2 cup Oil
4-5 Tomatoes chopped
2 tbsp Ginger Garlic paste
4 tbsp Onion finely chopped
1 tbsp Red chili powder
1 tsp Turmeric powder
1/2 tsp Black pepper powder
2 Cinnamon sticks
4 Cloves
4 Black pepper whole
Salt To taste
3/4 Cup yogurt
3 tbsp Butter
1/2 Cup Fresh cream
4 tbsp coriander chopped
4 Green chilies roughly chopped
1 tbsp Ginger Julian


 Method: 

In a big bowl, mix chicken pieces with salt, red chili powder, turmeric powder, black pepper powder and half quantity of mentioned yogurt.

Leave the marinated chicken for 15-20 minutes.

In a pot, heat oil and saute onion on medium flame.

Add ginger garlic paste, whole cloves, cinnamon, black pepper and fry for 2 minutes.

Add the marinated chicken and cook for another 6 minutes.

Now add tomatoes and green chilies.

Cook till chicken and tomatoes becomes tender.

Add remaining yogurt and cook till water evaporates.

Add butter and stir continuously till oil separates.

Now turn heat on low flame and add cream. Stir continuously till oil separates.

Dish out in a serving bowl and garnish with coriander an ginger.

Serve it with naan or boiled rice.


.


8/30/2015

Get Rid Of Double Chin


.
Photo: Web

Double chin is one such problem that all of us want to get rid of. Hiding extra fats under the chin by applying makeup contouring is not a permanent solution. Why not solve this problem for good. There are certain exercises that can help to reduce the double chin.

Here are some simple and easy steps to follow:

Sit straight with shoulders down.

Slowly tilt your head until you can see the ceiling. Now count from 1 to 5. Repeat 5 times.

Now bring your head downwards so that your chin touches your chest . Count from 1 to 10. Repeat 5 times.

Gently move your head first clockwise and then anti clockwise. Repeat 5 times.

Again tilt your head until you see the ceiling. Do not open your lips. Now make "O" with your mouth without letting your lips open. Hold for 15 to 20 seconds.

Now tilt your head towards the right shoulder and hold the position for 10 seconds.

Repeat the step with your left shoulder.


8/28/2015

Using Oil For Your Hairs Is Must!


.
Photo: Web

Hair is the crowning glory of a women for which they are always in search of remedies to halt the hair fall and to keep them shiny,long,lustrous. Many commercial formula based products are available in markets that are good for hairs but regular use can make scalp dry and hairs dull. Sometimes it can lead to dandruff problem.

Oiling your hairs is very important to keep them healthy and nourished.Oils such as coconut,almond,jojoba,mustard,sesame etc are well known for their hair nourishing properties.

Applying oil on scalp needs some tricks to have full benefits of hair oiling. Here are some tips:

Always use lukewarm oil as it stimulates hair follicles and encourage new hair growth.

Before applying oil comb your hairs to make them tangle free. It will avoid hair breakage during oiling.

Divide your hairs in two parts from the center of the scalp.

Apply oil directly to the scalp.

Gently massage scalp with help of your finger tips for at least 8 to 12 minutes.

For long hairs, take some oil in your palm and apply it through the strands.

Wrap oiled hairs in a medium hot towel for 15 minutes so that your scalp absorbs oil.

Wash hairs with desired shampoo after two hours.

For good results do hair oiling twice a week.


7/25/2015

Ice Cold Water As Skin Toner


.
Photo:Web

Toning is an vital part of a day-to-day skin care routine. Ice cold water is an excellent, cheapest and effective facial toner. It refreshes your skin and works best before applying any make-up. 


You can try homemade ice cold toner for perfect skin tone. 

After cleansing your face, dab on ice cold water on your face to close the open pores and tone it properly.

Another way is to place ice-cubes in a clean, soft cotton cloth and rub it all over your face. 

Do not rub so vigorously that your skin becomes red. 


.


12 Easy Ways To Get Rid Of Dark Circles


.

Stress, lack of sleep and poor diet leaves you with a set of dark circles and eye bags under your beautiful eyes. 

According to numerous doctors, dark circles are an accurate indicator of your poor health. 

Here are some easy tips to get rid of your dark circles:

1, Drink at least 8-10 glasses of water per day.
2, Double up on pillows at night to stop blood from building up under your eyes to turned into ugly eye-bags.
3, Have sound sleep of at least 8 hours.
4, Have balanced diet. B-vitamins, iron, Vitamin E are essentials.
5, Dark circles will disappear with a vitamin E boost.
6, Putting soaked tea bags on eyes for 20 minutes, can help diminish dark circles quickly.
7, Improve your diet with a vitamin-C infused drink or supplement.
8, Avoid too much salt in your diet.
9, Put two teaspoons in the refrigerator, and then wait for them to get cold. Once they are cold, lie down on your back and put the spoons on your dark circles.
10, Put cucumber slices on your eyes for 15 minutes. They will refresh tired eyes and take care of those black circles.
11, You can also make and apply a paste of milk and powdered almonds to your dark circles.
12, Eat a handful of vegetables in your salads. 


.

6/30/2015

Organise Your Dresser Drawers


.


Drawers needs your attention.

It is very difficult to find something important in a messy drawer. Sometimes it take too much time and energy to find out your required item in a huge wardrobe or even in a small sized clustered drawer. 

It would take only a couple of hours or 30 - 40 minutes to organize your messy compartments. 

Here are some tips to follow :

Discard all the empty beauty products including perfume bottles, used cream tubes, compacts, lip-gloss etc.

Now rearrange all lipsticks in a box in such a manner that you can find your desired shade just by seeing the number and code or mentioned color on the top.

In a similar way, put all your eye shade colors, compacts, mascara, eye liner, and all other items in separate boxes or small containers.

Reserve a shelf particularly for your clutch- evening party bags. 

Shoulder bags should be hanged to avoid damages of straps and chains.

Organize your heels, flats, pumps in the lower most shelf of your wardrobe or in a totally separate shoe rack.

Separate your winter summer clothing .

Put all the out of season dresses in a separate shelf.

Again separate your formal and casual wear of the current season.

You can also separate all the denim clothing from the rest of the dresses. 

Hang the formals in plastic zipped covers to avoid damages to embellishments.

Hang all the stoles, scarves and shawls so that you can find them whenever you want.


Tips To Enhance The Life Of Your Artificial Jewellery


.


Artificial jewellery or Fashion jewellery is something every woman wants to have it in her collection. The bling enhances any dress and wonderfully uplifts overall image. 

Being delicate, it needs some extra care, otherwise its shine and colour changes with time. 

Here are some simple tips to take care of your fashion jewellery:

Most important thing you can do is to avoid any perfume spray on jewellery while you are getting ready for any party/function.  

Make sure your artificial ornaments are not in direct contact with humidity or water. 

Leaving your jewellery pieces in washroom will dull their polish. 

Always store your jewellery in a velvet or any soft cloth pouch, it will avoid rusting and scratches.  

Avoid discoloring by painting artficial jewelry with clear nail polish.


.


Important Tips For Healthy And Beautiful Nails


.
PC:Tumblr


Our nails can show signs of an undetected ailment. They changes their appearance and colour to show the deteriorating health in a human body.

So, taking care of your nails should be a routine for you.

Here are some tips:

Always keep your nails clean.

Leave your cuticles alone! Do not bite or cut them, as it can give you some bacterial infection and swollen nails; even fingers.

Apply good moisturizer to your nail bed and cuticles, it will help with breaking and chipping off layers.

Applying oil around cuticles helps moisturizing whole nail.

Always keep it in mind that you should foil your nails in one direction.

Soaking for the purpose of manicures, actually dries nail bed and cuticles.

Non-toxic remover is good for the health of nails.

Do not use your nails as opener or to scratch something. It will give brittle nails.


.


Just For Your Luscious Lashes


.
photo:web

Every woman knows long eyelashes add some extra beauty to her face and to make her eye lashes beautiful women adopts different methods. Stores usually offers artificial products that can be harmful to eyes. Homemade remedies are the best way to enhance the beauty of your eyelashes as they do not have any side effects.

Here are some tips:

Always remove your eye makeup gently with good makeup remover.

 Select Cleansing milk that has skin friendly ingredients particularly best for your skin type.

Never go to bed without removing eye makeup especially mascara.

Apply olive oil with the help of your finger tip on your lashes to make them grow faster.

Castor oil is another option that helps eyelashes to look thick and long.

Put used and cooled green tea bags on your eyes for good 5 to 8 minutes . Green tea helps in the growth of eyelashes.


Get Rid Of Uneven Skin Tone With A Simple Mask


.
Photo:web


Uneven facial skin tone looks very bad and destroy your overall image by promoting a tired and unhealthy look.  Every woman wants glowing and fresh skin tone and for this first step is to avoid unnecessary sun exposure. Some home remedies helps to get fresh skin tone.

Here is another simple homemade mask for uneven skin tone.


Cut 1 tomato and remove seeds.
Blend it with 1/2 cup of yogurt.
Add 2 drops of lemon juice.
Add 1 tbsp of oatmeal in it.
Mix all very well.

Wash your face with lukewarm water.
Apply the above mentioned mask to your face.
Leave it for 10-15 minutes.
Rinse your face with tap water.


.


Make An Egg - Banana Facial Mask


.
Photo: web
Although market shelves are full with variety of facial masks claiming to make your skin glow in few minutes, but nothing can compete home made mask with  natural or organic ingredients. These masks not only save money but are harmless for any kind of skin.

Today I am going to tell you an easy method to get rid of that dull look, pre-mature wrinkles, dehydrated skin and sensitivity. This mask provides brilliant anti aging effects for cracked and dry skin by giving it antioxidants and collagen combination. 

Lets make our home made egg-banana facial mask:

1 Egg 
1 Banana
1 tsp Coconut oil
1/2 tsp Honey

In a bowl crack 1 egg, slightly beat it with the help of a fork. 
Peel and cut 1 banana into small pieces. Mash it well.
Now put mashed banana in above beaten egg and mix these two ingredients very well.
Add coconut oil and honey in egg-banana mixture. mix it.

Application:

Wash your face with a mild soap or face-wash using lukewarm water.
There should be no traces of makeup on your skin.
Dry your face with soft towel.
Start applying mask on our face with fingers or cotton ball or with the help of mask brush.
Do not apply t on eyes or mouth area.
Leave it for good 10 minutes.
Wash your face with slightly warm water. 


Just For You: Homemade Yogurt Mask


.
Photo: Web

Hello every one, today I am going to share with you a very home made facial mask that can helps in nourishing your skin.

It is a yogurt based mask that will smooths, hydrates, the skin and will also helps in giving it a even look for a much more bright and fresh skin. Moreover, it also heals dry skin and reduces signs of aging due to its antioxidant properties.

It is very quick and easy to make it at home, all you have to do is to go in to your kitchen and pickup just a few things and you will be ready to make a cheap yet nourishing mask.

Here are the things you will need for younger, brighter, fresher look in few minutes:

Yogurt 2 tbsp
Honey 1 tsp
Banana 1

In a bowl take unsweetened plain yogurt and beat it well.
Add honey in beaten yogurt.
Peel banana and mash it well with the help of fork.
Mix mashed banana in yogurt honey mixture.

Application:

Wash your face with warm water to open facial pores.
Dry your face with a clean towel.
Start applying your mask with fingers.
Do not apply on eye and mouth area.
Leave it for 12-15 minutes.
Wash your face with lukewarm water.
Splash some cold water on your face to close facial pores again.


For Your Glowing Skin: Mayonnaise Mask


.
Photo: Web

Hello everyone, We all use facial masks to enhance our skin look and most of us would love to make their own facial masks with things easily available at kitchen counters.

For a dull and dry skin, the mayonnaise  mask is the wonderful remedy. It removes dead cells to rejuvenate skin.

Application:

Always wash your face with lukewarm water before applying any mask.
Pat dry your face with clean towel or cotton piece.
Apply 2 tbsp mayonnaise on your face with fingers or cotton ball.
Avoid eye and mouth area.
Leave 13-15 minutes.
Rinse your face with lukewarm water while gently rubbing your skin in circular motions.
Do not rub your skin harshly or you will face rashes.


.


Homemade Oatmeal Mask


.
Photo: Web

Oatmeal has numerous benefits for human skin. The antioxidant  and anti-inflammatory elements of oatmeal help skin against many problems, such as acne, irritations of face skin. In other words, oatmeal mask is refreshing for one's face.

Here is a simple home-made Oatmeal Mask for a fresh look.

2 tbsp Oatmeal,
2 tsp Honey
1/2 tsp Rose-Water

Preparation:

Grind your oatmeal in a clean grinder. There should be no leftover chilies in it.
Add 1 to 2 tbsp hot water in oatmeal. mix it in a bowl till it becomes paste like texture.
Leave it for few minutes to cool down.
Add honey in it and mix well.
Lastly add rose-water and mix it.

Application:

Cleanse your face with a good cleanser.
Dry face skin with a clean towel.
Apply your prepared mask with the help of your fingers on your face.
Do not apply it on your eye and mouth area.
Leave it for 8 to 12 minutes.
The mask may becomes hard as soon as it dries.
Wash with water while massaging your face skin.
Follow your routine  skin care afterwards.


.


Milk Mask For Better Skin


.
Photo: Web

Using milk for the purpose of beauty is an ancient trick. Many queens and princesses are reported to have used raw milk along with flowers to enhance the beauty of their skin. 

Application of milk on your skin promotes radiance and smoothness by exfoliating dead skin cells. Apart from this, milk is also helpful in preventing premature aging, curing irritations and allergic reactions. It shrink pores and remove skin blemishes.

Try this simple milk mask at your home. However, you should consult your doctor in case you have any skin problem.

Take 1/2 cup milk in a bowl.

Add few hand crushed rose petals in it.

Take clean cotton ball and dip it in milk mask.

Gently apply the cotton ball soaked in milk all over your face. 

Leave it for 8 - 12 minutes.

Wash your face with tape water. 

Tip:

If you want to use this mask as a scrub, add 1 - 2 tbsp grounded almonds in it. 


.


Homemade Banana Mask


.


Banana is one fruit that can enhance your beauty within few minutes. This fruit is full of nutritional components which are good for healthy glowing skin.

Many beauticians call it cheap 'Botox' for its extraordinary role in fixing and stopping the process of skin ageing.

Here is another easy mask for better look.

In a bowl, mash a fresh banana into a paste.

Apply it on your face, leaving the eye area.

Rinse it after 10-12 minutes with tap water.

You can massage your face with some ice cubes.


.


Easy Mango Mask For You


.


Today I am going to share an easy mango facial mask with you. 

Packaged with influential nutrients, the king of fruits will give your skin all the supporting lift it needs.


Applying mango pulp to your face will refresh and regenerate it as well as secure the moisture into dull skin cells. The mango mask promotes skin suppleness and holds back skin aging.

Lets try this simple mango mask.


Ingredients:

1 tablespoon mango pulp
1 teaspoon raw honey
1 teaspoon unflavoured yogurt

Directions:

In a small mixing bowl, combine the ingredients well.

Using clean fingertips, apply the mango face mask onto your clean face in a circular motion.

Let it sit for 10 to 15 minutes.

When the face mask dries up completely, use a warm wash cloth to remove it.

Rinse off with cold water. Pat dry with a soft towel.

Tips:

Make sure that you have not added any peel into your mask. The mango peel can give you skin rashes so avoiding it is essential. 


.